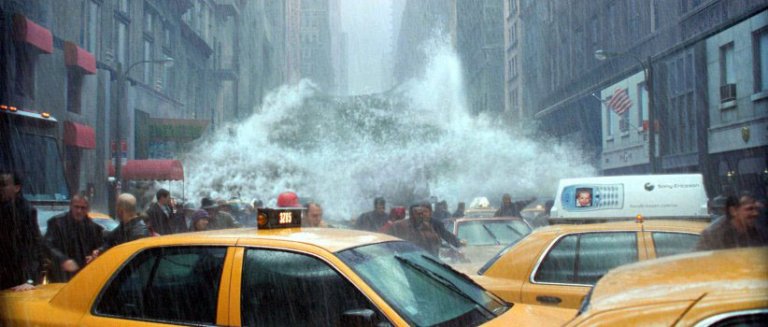
In this tutorial, we will learn how to manipulate a simple photo into a flooding torrent of a scene. We’ll use some relatively simple techniques to give this image a semi-realistic, stylized feel. Let’s get started!
Final Image Preview
Take a look at the image we’ll be creating. Want access to the full PSD files and downloadable copies of every tutorial, including this one? You can view the final image preview below.
Video Tutorial
Our video editor
Gavin Steele has created this video tutorial to compliment this text + image tutorial.
Step 1
With the
main image opened, use the Clone Stamp tool to remove any unwanted entities, like the elderly couple walking. Try and clone areas around the couple so it doesn’t look odd and mix your usage of soft, and heavy round brushes to define those edges.
Step 2
Next you will want to cut around the edges of the roof tops so we can add in our stormy sky. Use the Polygon Lasso Tool for this. Don’t worry about accuracy, as we’ll be blending everything later, just make sure that the sky is cut out. Once selected, unlock the “background.” Now double-click the layer, then rename it to “backdrop” and hit Enter. Delete the sky.
Step 3
Open the
Stormy Sky image and place it underneath your “backdrop” layer. Then press Command + T to Free Transform), hold Command while you drag the bottom corners inwards to add some perspective to the sky, don’t forget to resize if necessary. Apply the transformation when you are happy.
Step 4
It doesn’t look very nice does it? That’s because we’re not done yet. Open and place the
wave image in the center of the image. Now use the eraser, and a soft brush on it. Get in close and erase the bits you don’t want. Don’t worry if your messy, as the tidying comes later.
Then go to Image > Adjustments > Brightness/Contrast and use the settings shown below.
Then go to Image > Adjustments > Hue/Saturation and use these settings.
Rename the layer to “Wave,” and your image should now look like the one shown below.
Step 5
Now comes the complicated bit. What you’ll need to do is add all the
water files to you’re image and one by one, free transform them to flow with the perspective of the water then erase the hard edges.
You might also need to duplicate some files in order to fill up areas. Always remember to play about with the textures using the distortion method in free transform and a soft eraser. The more you do, the better it will look. You can see the phases of building up the flooding water in this image.
Step 6
Now we have our water sorted, merge all the “water” layers into one single layer and go to Image > Adjustments > Color Balance and use the following settings.
Your water should now be nice and blue and match the “wave” layer from earlier. Now merge the “wave” layer with the “water” one.
Step 7
Remember the tidy up I mentioned a while back? Well its time now. Turn off the “water” layer so you are left with just the backdrop and the sky.
With the Burn Tool selected at highlights and at 50% exposure, and a soft brush set, start burning the rooftops and the sky around the rooftops so they appear darker.
Open the
derelict1 image and place it at the right side of the street in the distance. Use a soft eraser to remove those sharp edges. Merge it with the “backdrop” layer.
Step 8
Let’s tidy up some more. Turn on the “water” layer sand and start tidying around the edges using a soft eraser. Then select the Smudge Tool and a 20px charcoal brush using the settings below.
Start smudging the edges of the “water” layer creating very small splashes and more defined edges to realistically create the effect of water hitting a surface. This might require patience and a steady hand, but time will pay off. It might also be wise to duplicate the layer before smudging as you don’t want to use all your undo’s.
Step 9
Next, select the backdrop layer and go to Image > Adjustments > Color Balance and use these settings.
And your piece should now be coming together. Its still a little off, but there is a lot more to do, so lets move on!
Step 10
Time for the splashes. Now this is the hardest step of the tutorial, and requires a lot of patience, but persevere and you will find that patience is in fact a virtue (I know, silly right?).
Open up the
splash1 and
splash2 images and carefully cut out the splashes themselves one by one. Place them onto the canvas. Now use the Warp Transformation (Edit > Transform > Warp) to get the arches you need to create effective splashes, and erase any unwanted areas.
You’ll need to do this for the two cars and for where the water hits the wall down the buildings of the street.
You might also benefit from smudging the edges of the splashes to give them more movement, as well as adding some white brushing to a new layer and smudging it. Now merge all your “splash” layers.
Step 11
Getting there right? Now you need to do some tweaking to the colors of the image. This can mean anything from water, to the sky or the buildings. In my example, I think the water is a little too blue, so I’m going to desaturate it a little.
Basically use this step for any odd bits and bobs to tweak your image to make it look more streamlined. Be creative, and more importantly, make it look tidy. I lowered the saturation of the water a little, and added some red to the buildings.
Step 12
Now we’ll work on the fog. Its sounds daunting but its actually fairly simple to do. Select a blue color from your water using the Eyedropper Tool. Now select the Gradient Tool and use the following settings.
You will need to create a new layer underneath you’re “water” layer and create the gradient so it blocks out any backdrop behind the water.
Duplicate the layer (Command + J) and place it on top of your water layer, at about 30% opacity. Set this layer to Multiply.
Step 13
This next step is to add rain. There are lots of tutorials on the web that show how to create rain.
Here is one that goes into great detail, which you could check out. We’ll keep it relatively simple in this tutorial though. First, create a new layer and fill it with black. Go to Filter > Noise > Add Noise and use these settings.
Then Filter > Blur > Motion Blur> and use these settings.
Then Image > Adjustments > Levels and use the following settings.
Set the Layer to Screen and use a soft eraser to erase the bottom and top of the Layer, then go to Edit > Transform > Free Transform the “rain” Layer so it covers the whole screen.
Step 14
It looks a little bit empty in the middle of the water doesn’t it?
Open up the
car image and place it somewhere in the distance,
underneath the “fog” layer. Resize the images and erase the edges carefully and use the
splash1 image to give some life to the car.
Step 15
Now is the fun part. You’ll need to create a few gradient maps first. Click the Adjustment layer button located at the bottom of your layers window and select the Gradient Map option. Then Click the little arrow in the top-right of the box and select Pastels as shown.
Use the following settings. Finally, set the layer to Multiply at 100%.
Conclusion
Now its just a case of adding depth and a few other adjustments. Select the Blur Tool at 20% strength, then start blurring the “backdrop” layer in the distance and on the rooftops.
Create a new layer and go to Image > Apply Image and then go to Filter > Sharpen > Sharpen, which gives the image a more detailed and stylized feel. Now you’re done!


 5:55 PM
 asw
asw

 Terima Kasih,