This is BizOppers
Showing posts with label Photographer. Show all posts

15 May 2011

Want iPad? Want to make that iPad into a mobile device? With yes life, that is possible. #YES4G


SOCIAL SHARING
RM 800.00 lagi untuk direbut

RM 0.20 - RM 0.40 setiap klik unik
TURN AN IPAD INTO A PHONE!

Have iPad or and iPod Touch? Want to make it into a mobile device? With yes life, that is possible. This 018 mobile number could even be used on your iPhone to save even more on calls and SMSes. Oh and by the way, when you're aboard, there's no roaming charges!

Sounds great? But don't have one? Well win an iPad! All you've got to do is join 'Say Yes. Win Big' and complete the slogan to stand a chance of winning an iPad 2!

21 April 2011

Vote The Best Handphone - Samsung Vs Apple

Kadangkala kita sukar untuk membuat pilihan dalam membuat dan mencari satu keputusan yang terbaik didalam memilih gadjet hebat untuk diri sendiri. Jikalau tersalah pilih, kita akan menyesal dengan menghabiskan beribu-ribu ringgit kerana gadjet pilihan kita amat mengecewakan. Disini saya ingin berkongsi dengan anda sebagai seorang pengguna yang bijak Handphone manakah yang menjadi pilihan anda? Sama ada Apple IPhone 4 yang digilai oleh semua lapisan masyarakat atau model terbaru dari Samsung Galaxy S dan S2 yang mempunyai gaya tersendiri. Bantulah saya didalam membuat keputusan. TERIMA KASIH !!!

Undilah demi kepentingan kita bersama


Which One Is The Best Android Hanphone ?
Samsung Galaxy S
Apple iPhone 4
Samsung Galaxy S2
HTC EVO

Results

19 March 2010

Sekadar Inginkan Pendapat Mengenai Gambar Ini...

Assalammualaikum,

Inzinkan saya menarik perhatian anda semua, saya nie baru menerokai alam jurugambar dan inginkan anda membuat komen mengenai gambar yang akan saya paparkan dibawah nie.. Sejujurnya komenlah apa sahaja yang ingin ada katakan untuk memperbaiki mutu serta kualiti gambar saya.. Komenlah, kutuklah, terjahlah dan berilah segala pendapat dan kepakaran anda buat saya memperbaikinya............

Segala komen dan terjahan anda akan diterima dengan ikhlas dan penuh kesyukuran... Terima Kasih

Inilah Gambarnya :-

Terima Kasih,

Salam 1 Malaysia

18 March 2010

Is HSBB available in my area?


Here, we show you where and when.

* The information displayed is accurate at the time of publishing. It is subject to change from time to time.


 Area Name
Support for Readiness
Bangsar Residential / Business
Q1 2010
Shah Alam Residential / Business
Q1 2010
Subang Residential / Business
Q1 2010
Taman Tun Dr. Ismail Residential / Business
Q1 2010
Bayan Baru Business
Q3 2010
Bukit Kemuning Residential / Business
Q3 2010
Bukit Tengah Business
Q3 2010
Cyberjaya Residential / Business
Q3 2010
Damansara Residential / Business
Q3 2010
Duta Residential / Business
Q3 2010
Kepong  Residential / Business
Q3 2010
Keramat Residential / Business
Q3 2010
KL International Airport Residential / Business
Q3 2010
Kulim HighTech park Business
Q3 2010
Lapangan Terbang Subang  Residential / Business
Q3 2010
Melawati Residential / Business
Q3 2010
Menara TM Residential / Business
Q3 2010
Midah Residential / Business
Q3 2010
Permas Business
Q3 2010
Petaling Jaya Residential / Business
Q3 2010
Puchong Residential / Business
Q3 2010
Putrajaya Residential / Business
Q3 2010
Seberang Jaya Business
Q3 2010
Senai Business
Q3 2010
Skudai Business
Q3 2010
Sungai Buloh Residential / Business
Q3 2010
Sungai Long Residential / Business
Q3 2010
Telok Panglima Garang  Business
Q3 2010
Wangsa Maju Residential / Business
Q3 2010
Batu Residential / Business
Q4 2010
Bukit Bintang  Residential / Business
Q4 2010
Cheras  Residential / Business
Q4 2010
Jln Kebun Residential / Business
Q4 2010
Kelana Jaya  Residential / Business
Q4 2010
KL Central  Residential / Business
Q4 2010
Klang Residential / Business
Q4 2010
Kuala Pauh  Residential / Business
Q4 2010
Pekeliling Residential / Business
Q4 2010
Saga Residential / Business
Q4 2010
San Peng  Residential / Business
Q4 2010
Selayang Residential / Business
Q4 2010
Sentul  Residential / Business
Q4 2010
Serdang  Residential / Business
Q4 2010
Setapak  Residential / Business
Q4 2010
Sg. Renggam Residential / Business
Q4 2010
Taman Petaling  Residential / Business
Q4 2010

17 March 2010

PELAKSANAAN JALUR LEBAR BERKELAJUAN TINGGI TM BERJALAN LANCAR


TM berada di landasan yang betul bagi penyediaan perkhidmatan HSBB secara komersil di empat kawasan awal iaitu Taman Tun Dr. Ismail, Bangsar, Subang Jaya dan Shah Alam pada akhir Q1 2010.


  • Persiapan ekosistem infrastruktur sokongan seiring dengan pembangunan infrastruktur fizikal Jalur Lebar Berkelajuan Tinggi (HSBB) sedang berjalan lancar
  • Kerja-kerja naik taraf telah selesai di 4 daripada 95 ibusawat telekomunikasi di seluruh negara yang terlibat dalam projek HSBB ini
  • Uijan pengguna secara tertutup akan bermula pada bulan November 2009, diikuti dengan ujian pengguna terpilih pada bulan Januari 2010.
1. Kerja-kerja infrastruktur HSBB TM sedang berjalan…kabel-kabel fiber optik sedang dipasang di Bangsar, salah satu daripada 95 ibu sawat di seluruh negara di bawah projek HSBB TM bernilai RM11.3 bilion bagi menyediakan perkhidmatan Rangkaian Generasi Akan Datang.
2. Halus bagaikan sehelai rambut…pandangan dekat fiber optik yang sedang dipasang. Kerja-kerja pemasangan amatlah rumit kerana setiap sambungan fiber mestilah bebas daripada partikel habuk bagi memberikan kualiti perkhidmatan terbaik.
Telekom Malaysia Berhad (TM) berada di landasan yang betul bagi melancarkan perkhidmatan runcit Jalur Lebar Berkelajuan Tinggi (HSBB) secara komersil di empat kawasan awal iaitu Taman Tun Dr. Ismail, Bangsar, Subang Jaya dan Shah Alam menjelang akhir Q1 2010. Setakat ini, TM sedang bekerja keras dan telah menyelesaikan kerja-kerja fizikal di 4 ibu sawat dan kerja-kerja pelaksanaan sedang berjalan di 44 daripada 95 ibu sawat seluruh negara yang dijangka akan diliputi oleh pelaksanaan awal perkhidmatan HSBB.
Menjelang akhir 2012 – selaras dengan selesainya fasa pertama projek HSBB kebangsaan ini seperti dipersetujui dengan pihak Kerajaan – kira-kira 1.3 juta premis seluruh negara akan mempunyai akses kepada perkhidmatan HSBB. Kawasan-kawasan yang akan menerima perkhidmatan tersebut, yang dikenali sebagai Zon 1, termasuklah kawasan utama Lembah Klang, Iskandar Malaysia, semua ibu negeri, zon perindustrian utama seluruh negara, institusi pengajian tinggi dan pintu-pintu masuk seperti pelabuhan dan lapangan terbang. Para pengguna di kawasan-kawasan ini dijangka akan menjadi pengguna utama aplikasi dan perkhidmatan yang memerlukan keupayaan dan kapasiti yang disediakan oleh rangkaian HSBB.
Dato’ Zamzamzairani Mohd Isa, Ketua Pegawai Eksekutif Kumpulan, TM, berkata, “Melangkah ke arah pelancaran komersil, seperti dijadualkan, kami akan memulakan ujian runcit perkhidmatantriple play HSBB termasuklah suara, Internet berkelajuan tinggi dan perkhidmatan IPTV melibatkan premis-premis terpilih di empat kawasan awal iaitu Taman Tun Dr. Ismail, Bangsar, Subang Jaya dan Shah Alam seawal bulan hadapan. Ujian perkhidmatan runcit HSBB akan dimulakan dengan 150 isi rumah melibatkan anggota-anggota TM yang tinggal di empat kawasan tersebut menjelang pertengahan November 2009. Selepas itu, pada bulan Januari 2010, tambahan 300 isi rumah terpilih dalam kawasan yang sama akan terlibat dalam fasa ujian runcit perkhidmatan HSBB yang lebih menyeluruh.”
Selain itu, TM juga telah melengkapkan dua ujian pengguna untuk menentukan komposisi pakej runcit HSBB yang terbaik yang akan merangkumi perkhidmatan asas dan tambahan dan akan diumumkan sebelum tarikh pelancaran pada tahun hadapan.
Sehingga akhir Q2 2009, Kerajaan telah membuat bayaran balik sebanyak RM665 juta untuk kerja-kerja yang telah diselesaikan. Proses pembayaran balik ini merangkumi perbelanjaan kerja-kerja untuk infrastruktur akses HSBB dan pelaksanaan IP teras HSBB serta penambahan kapasiti rangkaian antarabangsa di bawah perjanjian PPP.
Sementara itu, penyediaan ekosistem infrastruktur sokongan selari dengan pembangunan infrastruktur fizikal projek Jalur Lebar Berkelajuan Tinggi (HSBB) nasional ini juga sedang dilakukan. Untuk itu, lebih daripada 4,700 anggota TM telah menjalani sesi latihan berkaitan HSBB. Selain itu, TM juga telah melatih 489 daripada 800 kontraktor HSBB TM bagi memantau perlaksanaan akses fiber fizikal.
Pada masa yang sama, TM akan terus memacu penembusan jalur lebar di Malaysia menerusi perkhidmatannya yang dikategorikan sebagai Jalur Lebar Untuk Masyarakat Umum (BBGP). BBGP merupakan perkhidmatan jalur lebar yang menawarkan kelajuan sehingga 4.0Mbps menerusi teknologi berwayar, wayarles dan mudah alih seperti DSL, WiFi, WiMax dan High Speed Downlink Packet Access (HSDPA) yang boleh diperoleh di seluruh negara.


Sebagai Pembekal Perkhidmatan Internet (ISP) terkemuka negara, TM akan terus menyediakan BBGP di Zon 2 dan 3 bagi para pengguna di seluruh negara dan membantu merapatkan jurang digital. Pada masa ini setakat Q2 2009, TM mempunyai lebih 1.4 juta pelanggan Streamyx (tidak termasuk pelanggan Streamyx Zone). Meningkatkan pengalaman pelanggan bagi BBGP terus menjadi fokus utama dan TM akan terus menangani penambahbaikan perkhidmatan dan rangkaian. Ke arah ini, TM telah melaksanakan pelbagai inisiatif termasuklah memperkenalkan lebih banyak pusat hubungan pelanggan bagi memberikan lebih akses kepada produk dan perkhidmatan TM, pelaksanaan pendekatan yang inovatif bagi perkhidmatan yang lebih pantas di TMpoint, program kesetiaan pelanggan serta saluran pembayaran yang lebih mudah.
  
Mengenai TM
Telekom Malaysia Berhad (TM), sebuah syarikat maklumat dan komunikasi bersepadu terkemuka di Malaysia, menawarkan perkhidmatan dan penyelesaian komunikasi yang menyeluruh dalam bentuk jalur lebar, data dan talian tetap. Sebagai peneraju pasaran dalam perniagaan jalur lebar dan talian tetap, TM sentiasa bergerak ke arah memberikan nilai terbaik untuk pemegang kepentingannya dalam persekitaran yang kompetitif. Kumpulan juga sentiasa memberi tumpuan kepada usaha-usaha peningkatan kualiti dan inovasi khidmat pelanggannya.
Dengan rangkaian globalnya yang meluas, TM mampu untuk meletakkan Malaysia sebagai hab Internet serantau dan gerbang digital bagi Asia Tenggara. Sejajar dengan itu, TM kini sedang bergerak maju ke arah menjadi pembekal perkhidmatan Rangkaian Generasi Akan Datang dan membolehkan Kumpulan meningkatkan kecekapan dan produktiviti sambil menawarkan produk dan perkhidmatan yang diperkaya.
Dari segi Tanggungjawab Sosial Korporat (CSR), Kumpulan sering menjadi penyumbang korporat utama ke arah aktiviti-aktiviti bermanfaat dengan berpendirian bahawa amalan sedemikian merupakan rukun asas kepada urus tadbir korporat yang baik. Kumpulan menyokong 3 platform utama iaitu pendidikan, pembinaan masyarakat/negara dan alam sekitar. Dalam pendidikan, TM telah membelanjakan kira-kira RM800 juta untuk membangunkan Universiti Multimedia menjadi salah satu universiti terkemuka di Malaysia yang mempunyai lebih 20,000 orang pelajar. TM juga memberikan biasiswa kepada lebih 10,000 graduan yang melanjutkan program akademik di dalam dan luar negara. Di bawah platform pembinaan masyarakat/negara, Kumpulan menyumbang kepada usaha-usaha yang memberi nilai buat masyarakat dan negara, amnya. TM telah dianugerahkan dengan anugerah berprestij STAR-BIZ ICRM Corporate Responsibility untuk kategori Tempat Kerja bagi tahun 2008.

Untuk maklumat lanjut mengenai TM, layari www.tm.com.my

16 March 2010

How to Create a Photo Manipulation of a Flooded City Scene

In this tutorial, we will learn how to manipulate a simple photo into a flooding torrent of a scene. We’ll use some relatively simple techniques to give this image a semi-realistic, stylized feel. Let’s get started!
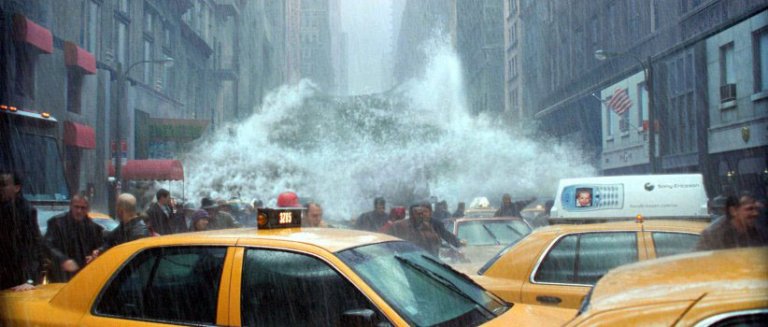
Final Image Preview

Take a look at the image we’ll be creating. Want access to the full PSD files and downloadable copies of every tutorial, including this one? You can view the final image preview below.

Video Tutorial

Our video editor Gavin Steele has created this video tutorial to compliment this text + image tutorial.

Step 1

With the main image opened, use the Clone Stamp tool to remove any unwanted entities, like the elderly couple walking. Try and clone areas around the couple so it doesn’t look odd and mix your usage of soft, and heavy round brushes to define those edges.

Step 2

Next you will want to cut around the edges of the roof tops so we can add in our stormy sky. Use the Polygon Lasso Tool for this. Don’t worry about accuracy, as we’ll be blending everything later, just make sure that the sky is cut out. Once selected, unlock the “background.” Now double-click the layer, then rename it to “backdrop” and hit Enter. Delete the sky.

Step 3

Open the Stormy Sky image and place it underneath your “backdrop” layer. Then press Command + T to Free Transform), hold Command while you drag the bottom corners inwards to add some perspective to the sky, don’t forget to resize if necessary. Apply the transformation when you are happy.

Step 4

It doesn’t look very nice does it? That’s because we’re not done yet. Open and place the wave image in the center of the image. Now use the eraser, and a soft brush on it. Get in close and erase the bits you don’t want. Don’t worry if your messy, as the tidying comes later.
Then go to Image > Adjustments > Brightness/Contrast and use the settings shown below.
Then go to Image > Adjustments > Hue/Saturation and use these settings.
Rename the layer to “Wave,” and your image should now look like the one shown below.

Step 5

Now comes the complicated bit. What you’ll need to do is add all the water files to you’re image and one by one, free transform them to flow with the perspective of the water then erase the hard edges.
You might also need to duplicate some files in order to fill up areas. Always remember to play about with the textures using the distortion method in free transform and a soft eraser. The more you do, the better it will look. You can see the phases of building up the flooding water in this image.

Step 6

Now we have our water sorted, merge all the “water” layers into one single layer and go to Image > Adjustments > Color Balance and use the following settings.
Your water should now be nice and blue and match the “wave” layer from earlier. Now merge the “wave” layer with the “water” one.

Step 7

Remember the tidy up I mentioned a while back? Well its time now. Turn off the “water” layer so you are left with just the backdrop and the sky.
With the Burn Tool selected at highlights and at 50% exposure, and a soft brush set, start burning the rooftops and the sky around the rooftops so they appear darker.
Open the derelict1 image and place it at the right side of the street in the distance. Use a soft eraser to remove those sharp edges. Merge it with the “backdrop” layer.

Step 8

Let’s tidy up some more. Turn on the “water” layer sand and start tidying around the edges using a soft eraser. Then select the Smudge Tool and a 20px charcoal brush using the settings below.
Start smudging the edges of the “water” layer creating very small splashes and more defined edges to realistically create the effect of water hitting a surface. This might require patience and a steady hand, but time will pay off. It might also be wise to duplicate the layer before smudging as you don’t want to use all your undo’s.

Step 9

Next, select the backdrop layer and go to Image > Adjustments > Color Balance and use these settings.
And your piece should now be coming together. Its still a little off, but there is a lot more to do, so lets move on!

Step 10

Time for the splashes. Now this is the hardest step of the tutorial, and requires a lot of patience, but persevere and you will find that patience is in fact a virtue (I know, silly right?).
Open up the splash1 and splash2 images and carefully cut out the splashes themselves one by one. Place them onto the canvas. Now use the Warp Transformation (Edit > Transform > Warp) to get the arches you need to create effective splashes, and erase any unwanted areas.
You’ll need to do this for the two cars and for where the water hits the wall down the buildings of the street.
You might also benefit from smudging the edges of the splashes to give them more movement, as well as adding some white brushing to a new layer and smudging it. Now merge all your “splash” layers.

Step 11

Getting there right? Now you need to do some tweaking to the colors of the image. This can mean anything from water, to the sky or the buildings. In my example, I think the water is a little too blue, so I’m going to desaturate it a little.
Basically use this step for any odd bits and bobs to tweak your image to make it look more streamlined. Be creative, and more importantly, make it look tidy. I lowered the saturation of the water a little, and added some red to the buildings.

Step 12

Now we’ll work on the fog. Its sounds daunting but its actually fairly simple to do. Select a blue color from your water using the Eyedropper Tool. Now select the Gradient Tool and use the following settings.
You will need to create a new layer underneath you’re “water” layer and create the gradient so it blocks out any backdrop behind the water.
Duplicate the layer (Command + J) and place it on top of your water layer, at about 30% opacity. Set this layer to Multiply.

Step 13

This next step is to add rain. There are lots of tutorials on the web that show how to create rain. Here is one that goes into great detail, which you could check out. We’ll keep it relatively simple in this tutorial though. First, create a new layer and fill it with black. Go to Filter > Noise > Add Noise and use these settings.
Then Filter > Blur > Motion Blur> and use these settings.
Then Image > Adjustments > Levels and use the following settings.
Set the Layer to Screen and use a soft eraser to erase the bottom and top of the Layer, then go to Edit > Transform > Free Transform the “rain” Layer so it covers the whole screen.

Step 14

It looks a little bit empty in the middle of the water doesn’t it?
Open up the car image and place it somewhere in the distance, underneath the “fog” layer. Resize the images and erase the edges carefully and use the splash1 image to give some life to the car.

Step 15

Now is the fun part. You’ll need to create a few gradient maps first. Click the Adjustment layer button located at the bottom of your layers window and select the Gradient Map option. Then Click the little arrow in the top-right of the box and select Pastels as shown.
Use the following settings. Finally, set the layer to Multiply at 100%.

Conclusion

Now its just a case of adding depth and a few other adjustments. Select the Blur Tool at 20% strength, then start blurring the “backdrop” layer in the distance and on the rooftops.
Create a new layer and go to Image > Apply Image and then go to Filter > Sharpen > Sharpen, which gives the image a more detailed and stylized feel. Now you’re done!

The Best 40 Photoshop Text Effects from 2009

On Monday past we published the post 49 Most Creative Photoshop Tutorials of 2009, a collection of the best artistic tutorials for Photoshop from this year. As a follow up to that post, today we have The Best 40 Photoshop Text Effects from 2009, a collection of diverse and unique effects and type treatments that will add a little extra to your next design.
Add Fantastic Color to 3D Text
Best of Photoshop Text Effects Tutorials 2009
Create Smoke Text
Best of Photoshop Text Effects Tutorials 2009
Create a Metal Piece with a Graved Text
Best of Photoshop Text Effects Tutorials 2009
Impressive-Looking Text Effect
Best of Photoshop Text Effects Tutorials 2009
Water Text Effect
Best of Photoshop Text Effects Tutorials 2009
Furry Text in Photoshop
Best of Photoshop Text Effects Tutorials 2009
Sparkling Text Wallpaper
Best of Photoshop Text Effects Tutorials 2009
Deep Grunge Text Effect
Best of Photoshop Text Effects Tutorials 2009
Cool Wet Ink Typography Effect
Best of Photoshop Text Effects Tutorials 2009
Create A Floral Colorful Solid Text Effect
Best of Photoshop Text Effects Tutorials 2009
Stunning Detailed Typography
Best of Photoshop Text Effects Tutorials 2009
Create a Bright Floral Text Effect
Best of Photoshop Text Effects Tutorials 2009
Create a Frilly 2009 Typo
Best of Photoshop Text Effects Tutorials 2009
Realistic Scorching Fire Effect
Best of Photoshop Text Effects Tutorials 2009
Retro Text Effect in Photoshop
Best of Photoshop Text Effects Tutorials 2009
Create Remarkable 3D Text
Best of Photoshop Text Effects Tutorials 2009
Aqua Text Effect
Best of Photoshop Text Effects Tutorials 2009
Create a Steam Powered Typographic Treatment
Best of Photoshop Text Effects Tutorials 2009
3D Type Explosion
Best of Photoshop Text Effects Tutorials 2009
Create an Ice Text Effect
Best of Photoshop Text Effects Tutorials 2009
Grungy Rusted Carbon Fiber Text Effect
Best of Photoshop Text Effects Tutorials 2009
Stunning Text on Wild Fire Effect
Best of Photoshop Text Effects Tutorials 2009
Geometric Shaped Typography with Grungy Background
Best of Photoshop Text Effects Tutorials 2009
Design a Slick 3D Ice Text Effect
Best of Photoshop Text Effects Tutorials 2009
Create Eroded Metal Text
Best of Photoshop Text Effects Tutorials 2009
3D Typography Tutorial
Best of Photoshop Text Effects Tutorials 2009
Shiny Calligraphy Text Effect
Best of Photoshop Text Effects Tutorials 2009
Chilling and Icy Text Effect
Best of Photoshop Text Effects Tutorials 2009
3D Text Shatter Effect
Best of Photoshop Text Effects Tutorials 2009
God of War III Inspired Cracked Text Effect
Best of Photoshop Text Effects Tutorials 2009
Golden Flame Text Effect
Best of Photoshop Text Effects Tutorials 2009
Gorgeous Glassy Text Effect
Best of Photoshop Text Effects Tutorials 2009
Candy Coated Text Effect
Best of Photoshop Text Effects Tutorials 2009
Milk Typography Effect
Best of Photoshop Text Effects Tutorials 2009
3D Text Scene Using Photoshop
Best of Photoshop Text Effects Tutorials 2009
Cloudy Text Effect
Best of Photoshop Text Effects Tutorials 2009
Richly Ornate Typographic Illustration
Best of Photoshop Text Effects Tutorials 2009
Create Smokey Typography in 12 Steps
Best of Photoshop Text Effects Tutorials 2009
Copper Photoshop Text Effect
Best of Photoshop Text Effects Tutorials 2009
How to Create a 3D Text Photo Manipulation
Best of Photoshop Text Effects Tutorials 2009

Share

Related Posts Plugin for WordPress, Blogger...
Twitter Delicious Facebook Digg Stumbleupon Favorites More

 
Powered by Blogger